Creating a Cubase 12 Template
Creating a Cubase 12 Pro template is a fairly quick process, even if you are a beginner to the DAW from Steinberg. Templates can be tremendously useful and when generated correctly, can greatly improve your workflow and project navigation.
Here, we will provide you with valuable insights on how to create your very own Cubase 12 template. Whether you’re a beginner or an advanced user, we’ve got you covered. To make things easier, we’ve added buttons/links that will take you directly to the content you’re interested in should you need them.
Quick Links
Template Selection
Template Selection
Cubase comes with a select number for pre-designed templates ready to use. Building your own template from scratch doesn’t take long and of course has that unique personal touch that will be more inline with your brain’s own logic and perspective.
Why templates?
Creating templates for different project types is undeniably valuable, creating your latest 4 on the floor stomp masterpiece is great, what about if you want to brag about it on YouTube, or podcast your superior sound engineering skills (different templates save you time).
Can I share templates?
Yes with a caveat*. You can share templates with other folk, just remember to keep them void of non stock instruments (Cubase installation native is ok) and 3rd party FX/VST plugins. It’s better off to create templates with folder, group track and FX track ready place holders only.
Marker Track
Marker Track
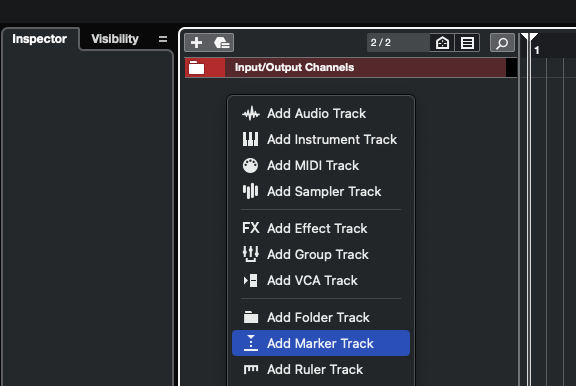
The marker track in Cubase allows you to mark specific points in your project, such as the beginning of a verse or chorus. You can access the marker track by going to the “Project” menu and selecting “Marker Track.” , alternatively RMC (right mouse click) in the channel window/pane and select ‘Add Marker Track’
Deleting and jumping to Markers
You can click on a created marker and hit the delete button to remove it from the marker track. Double clicking on a marker track will jump the progress/play bar to that position. You may also jump to marker positions by using the numeric keypad (if you have one on your keyboard, N.B. – num1 and num2 are defaulted to Left and Right ‘locators’ respecively)
Tempo Track
Tempo Track
The tempo track in Cubase allows you to change the tempo of your project over time. You can access the tempo track by going to the “Project” menu or clicking on the “Tempo” button in the transport panel. To create tempo changes, you can add tempo points, use the pencil or line tool, or set tempo curves. The tempo track is reflected in the project’s timeline, allowing you to see where the tempo changes occur.
Do I need a tempo track?
Most EDM productions will make use of a fixed tempo, though a change for a specific section such as breakdown can be used to create tension and a feeling of anticipation in your listeners. Of course, if you are an unsaintly person, you might create micro variations to mess with beat grid-dependent DJs, they will really adore you for this.
Set Tracks to Musical Mode For Smooth Changes
Yes you can have either step bpm changes or smooth ramp changes over time.
Chord Track
Chord Track
The chord track in Cubase allows you to add harmonic information to your project, such as chord progressions. You can access the chord track by going to the “Project” menu and selecting “Chord Track.” To add chords, you can either play them in using a MIDI keyboard or manually input them using the editor. The chord track also allows you to transpose your project to different keys, and it can be used to generate harmonies or melodies based on your chord progression. The chord track is useful for songwriting, arranging, and creating harmonically complex projects.
Is the Chord Track useful for EDM?
We would recommend the chord track for any genre or production, even if it is simplistic, hard edged, gritty Techno. Using the chord track allows you to demo out progressions in new instruments very quickly. Cubase chord builder is simple to use and you can extract chords from existing audio works (songs) and have them appear on the chord track.
Chord Tracks for everyone
Do not miss out on this simple but very effective tool in Cubase, it will have a positive impact on your work.
Arranger Track
Arranger Track
The arranger track in Cubase allows you to create different arrangements of your project, such as a verse-chorus-bridge structure. You can access the arranger track by going to the “Project” menu and selecting “Arranger Track.” To create an arrangement, you can add sections such as verse or chorus and then arrange them in the desired order. You can also create variations of sections, such as a different drum pattern for a chorus. The arranger track is useful for experimenting with different song structures or creating multiple versions of a project for different purposes.
Why is the Arranger Track an advantage?
Historically it took some time to cut, select and move sections of your track around. Now you can work on individual sections of your track that may not necessarily connect in a linear order. Using the arranger chain allows you to chain upto 20 events, jumping back and forth instantly to events along the project time line.
Folder Tracks
Folder Tracks
Folder tracks in Cubase are useful for organizing and grouping related tracks in your project. By using folder tracks, you can group together similar tracks, such as all the drum tracks or all the vocal tracks, and then process them as a single entity. You can also mute a folder and this will mute all the instruments and audio tracks contained within the folder
Folder tracks can also be used to simplify your project and reduce clutter. If you have a lot of tracks in your project, folder tracks allow you to collapse them into a single folder, making it easier to navigate and manage your project.
Tidy workspace for a tidy mindset
Starting out with some pre-defined folders for your instrument types is a great way for keeping things organised as your project grows with its successive layers, they will save you time when trying to isolate and audition parts. Less time spent on navigating is more time for focus on creation.
Should I nest folders?
Absolutely, a parent folder might contain several child folders and group tracks. So we might have a parent drum folder and yet it is practical to have a sub folder for electronic drums and then another real kit sounds, with a third for percussion (non standard drum kit) sounds.
Group and FX Channels
Group and FX Channels
Group and FX channels in later versions of Cubase have become closely related when compared to their original implementation and purpose in earlier releases.
Both options could pretty much do the same job, however the visual aspect when it comes to routing your tracks is a little different. Sometimes it can be helpful to think of FX tracks as simply where your FX stuff happens and group tracks as where your grouped (similar instrument) tracks are sub-master controlled.
Group Channels
The logical aspect of group channels is to have closely related instruments, for example drums, being grouped together so that dynamic compression could be applied alongside volume changes.
This can be useful for applying particular sound shaping characteristics of EQ adjustment to all tracks in the group.
FX Channels
A more common use for FX tracks is to send signals from tracks in the project to be affected by the FX track plugin(s). Using an FX track can make more logical sense than adding insert FX to each individual track, instead of having 7 reverb instances running, you could simply send those track signals to the FX bus (track) and use the one instance.
Saving and Loading Templates
Saving and Loading Templates in Cubase
In Cubase Pro, you can save and load templates to quickly set up your project with your preferred settings and track configurations.
Ultimately the less time you have to use in order to complete mundane repetitive tasks, the more time you earn for generating your floor-filling masterpieces.
Saving a template in Cubase
Once you have performed all the track additions, customised your layout, added FX, folders and tweaked anything else you normally use in your workflow, it is time to save your template.
”1.
2. Enter a name for the template
3. Choose a category e.g. 'production'
4. Click Save
Loading a Template in Cubase
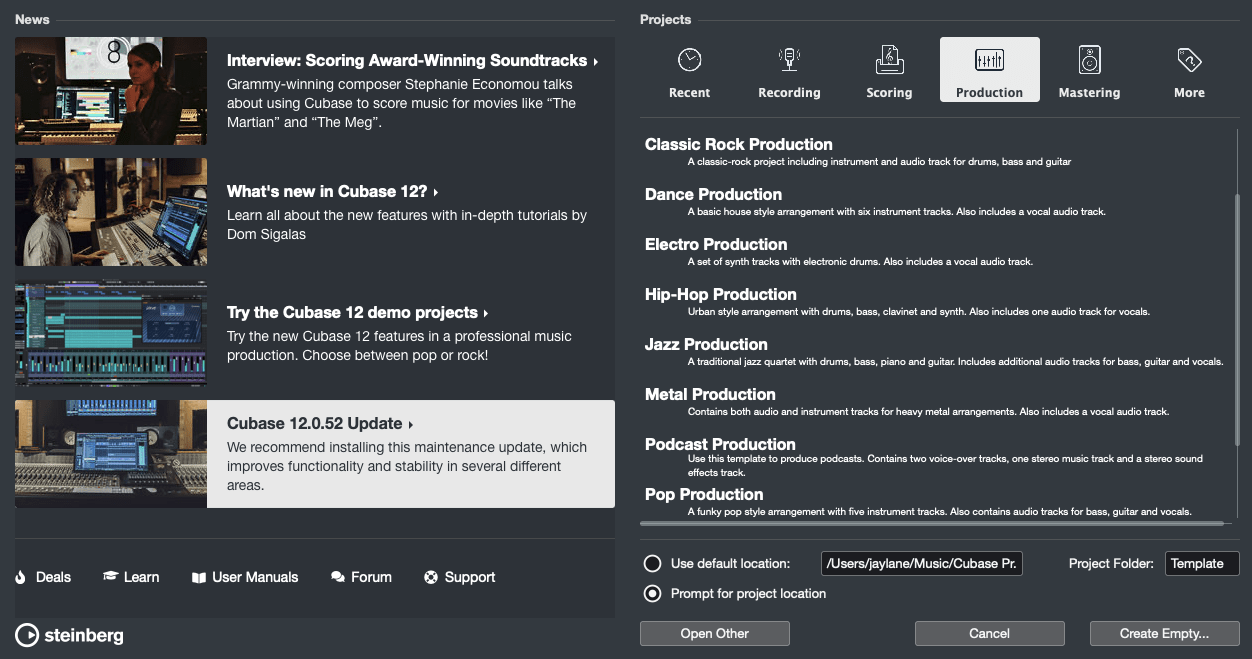
When you start Cubase in the default launch mode, you will see the news update (on the left) and the template library (on the right). You will select a template for your project out of the template library.
1. Choose the library folder e.g. 'Production'
2. Select the template you made e.g. 'EDM-Tem...'
3. Click on the 'create' button
Cubase 12 Pro Simple Template Demo
This is the demo template in this article, naturally this is a very simple template. You can build on it, customising it as your knowledge grows, incorporating VST instruments and FX that you often use. Load this in Cubase, then save it as a template following the instructions in this article about saving templates.


